by Mike Brown | Dec 11, 2018 | Jira
Sometimes, you need to get more out of what you’re viewing in your issue. Out of the box, Atlassian provides a powerhouse of options and field customizations available to the user. However, users of Jira often get hung up on the terminology and vocabulary introduced through a Jira issue (i.e. Summary = Title of an issue).
Enter Copy & Sync, a versatile and powerful app developed by Elements allowing administrators to add custom data panels (and more) to your issues. You can find the app and further details here: Copy & Sync.
Why Copy & Sync?
Copy & Sync enables you to display data the way you would like your users to read it in an issue view. Users will be able to view everything they need out of an issue screen, and will not need to cycle / navigate between multiple issues. Overall, this app increases the overall usability of your Jira instance, enabling users to have all the data points they need at their fingertips.
Custom Display & Data Panels
Copy & Sync allows users to display custom data panels directly in the Jira issue. A perfect example would be to display a data panel on a story issue type displaying bugs related to that user story. To create this panel, navigate to the Add-ons section, and find the Configuration link for Copy & Sync. You will need to be a Jira Administrator to configure this panel.
- Synchronisations – under the “Synchronisations” tab, select the information you’d like to synchronize with (it will be with your local Jira instance).
- Fields Mapping – map fields you would like to display in your panel.
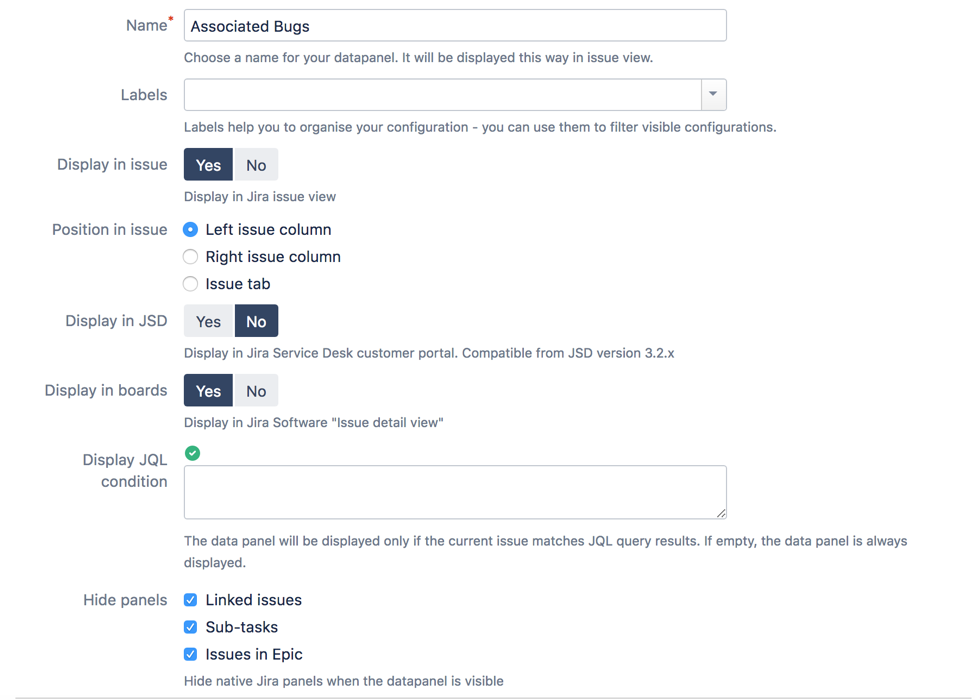
Data Panel – select the following information:
- Display JQL Condition – determine which issues will display this panel
- Hide Panels – hide any standard issue panels (see my example input below)
- Issue to Display – displays issues which match a specific JQL and Link Type
- Linked Issues Filter – displays the specific issues in the panel, here I want to display all bugs (issuetype = Bug)
- Link Type – display the linked issue type you would like to have on the panel. Here I’m going to only show blocked issue links.
- Table – Display any custom headers (explained in more detail below)
- Actions – This section allows you to further refine the panel, data displayed, etc.
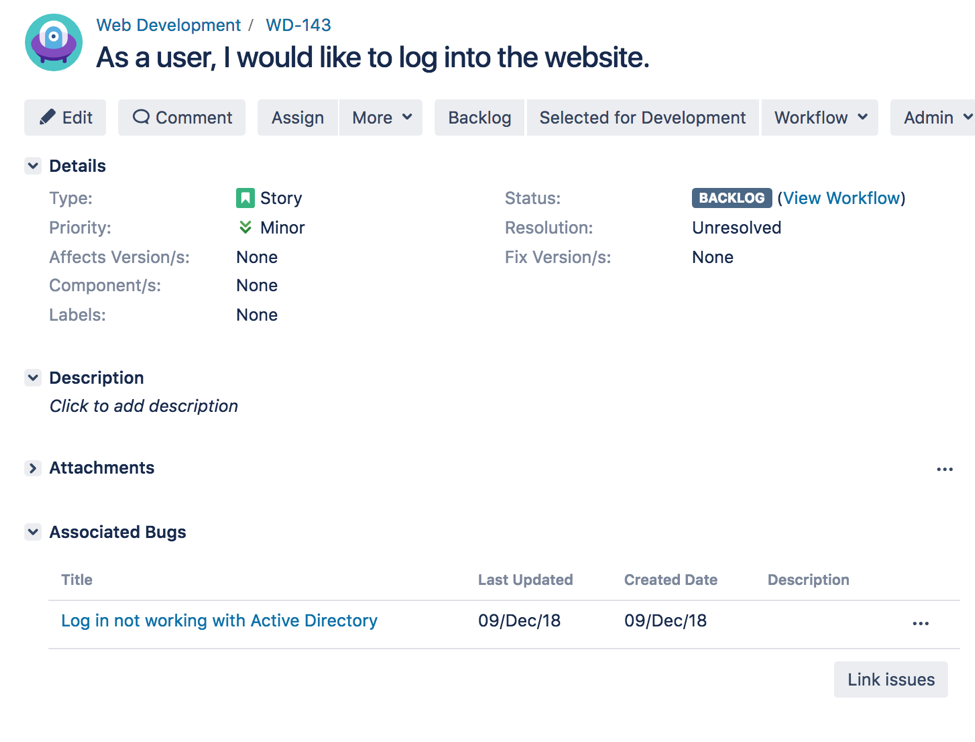
After you completed these configurations, click save and navigate back to your issue. You will see a new panel, with the custom Summary field pointing to ONLY bugs with the “Blocked” link type in your User Story. Note the “Issue Links” panel is now hidden:
Display Custom Headers
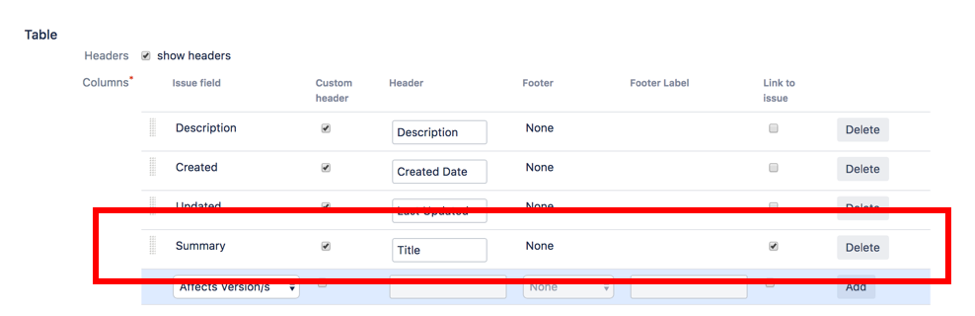
If you want to remove or re-name fields in your Data Panel, you can update this in the “Table” section of the Data Panel. Under Columns, select the field you would like displayed, check “Custom Header” and type a custom title / field name.
In this example, I have set the value of “Summary” to “Title” in the Header column. Note the order of the fields. With “Summary” (i.e. Title) being at the bottom, this will display first in the issue on the left-hand side.
Collaborate With ScriptRunner to Hide Noise in your Issue
Looking to hide some of those other Data Panels and just display the panels you created using Copy & Sync? Out of the box, Copy & Sync allows you to hide Linked issues, Sub-Tasks, and Issues in Epic. But, if you’re looking to hide other panels, this is the place!
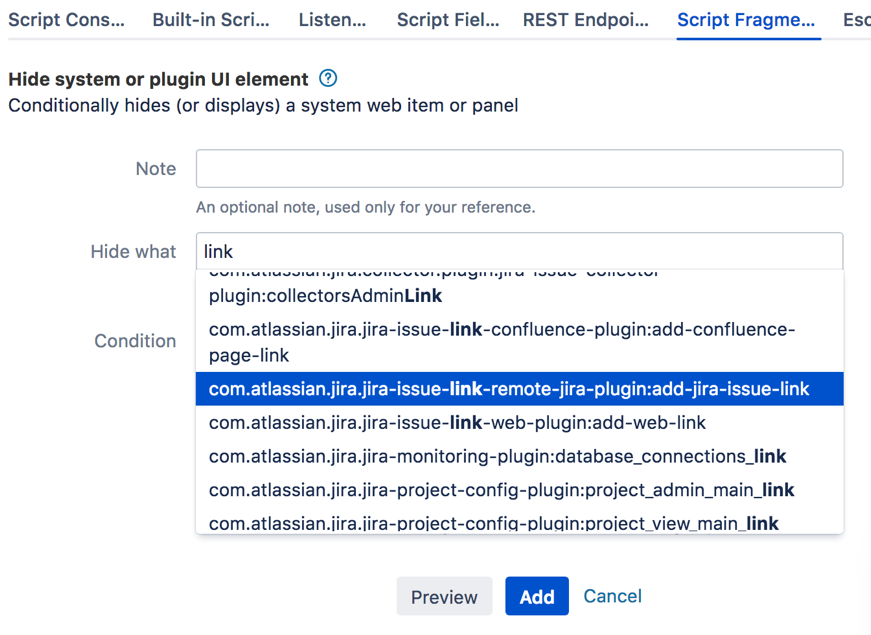
Utilize the ScriptRunner “Script Fragments” functionality to show or remove web panels from an Issue view. Under Script Fragments, select “Hide system or plugin UI element” and search for the panel / UI component you’re looking to hide in your issue.
Copy & Sync provides even more customization / capabilities than mentioned in this blog. We encourage you to check it out, and find some excellent workarounds and new methods to display your data consistently across Jira issues.
Are you using Copy & Sync? Interested in learning more? Contact us!
by Mike Brown | Nov 26, 2018 | Agile, Jira
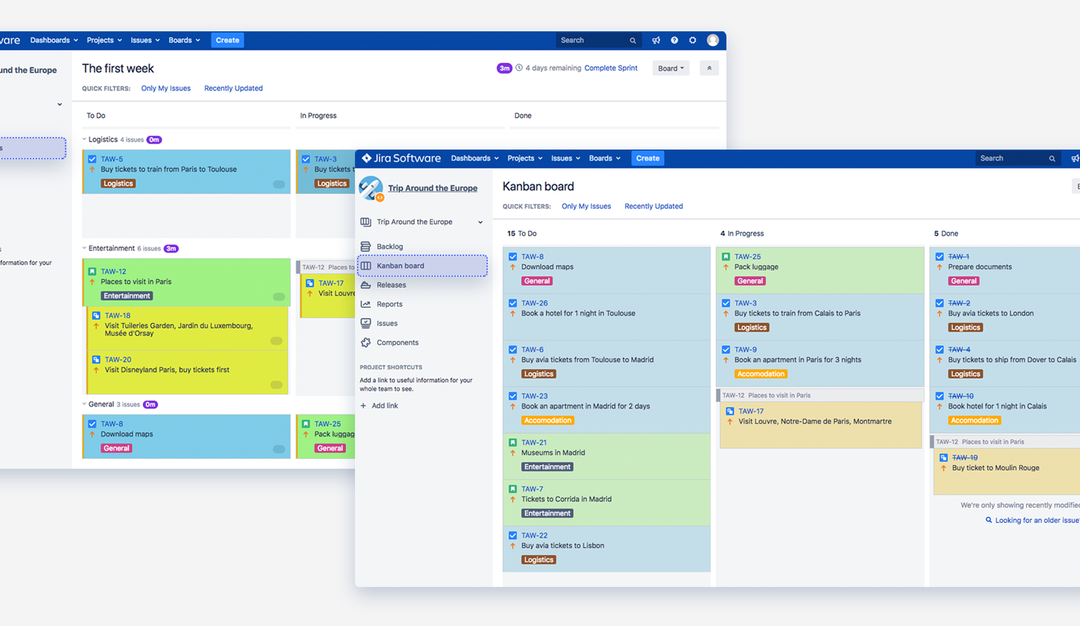
There are many ways to use Color Cards, a free app for Jira Software server available through the Atlassian Marketplace. In this blog, we are going to focus on three ways you can use Color Cards for your agile team, or just to improve visualizations in your Kanban or SCRUM boards. Note: You will need to be a board administrator to make the configurations below.
View Cards Coming Due
There is an easy way to view all the cards your team has coming due by using the “Queries” selection in the Color Cards Board Administration screen. If you use the Due Date field with Jira, using a query such as due <= 3d will yield all issues / tasks / bugs due in the next 3 days. If you reverse the operator to show due >= 3d will yield all issues that are overdue by at least 3 days. To set up this board configuration, perform the following:
- Go to the Color Cards Board Admin Screen.
- Select “Queries” from Colors Based On drop-down.
- Write the JQL query (due <= 3d).
- Select a color for the query.
- Click “Add”
Now you will be able to see all issues highlighted coming due in the next 3 days. You can also create ranges of due dates as well using JQL. We recommend using the Search function in Jira to test / craft advanced JQL functions.
View Issues Assigned to Different Versions
Boards can quickly become cluttered with custom card layouts, Swim lanes, and quick filters. Your team may be responsible for working on issues / stories / tasks that will be released over multiple versions. If so, you can easily view issues assigned to different versions on the same board and / or backlog. We recommend using Queries to identify versions and releases, i.e. fixVersion = 1.0.0 will provide a color for all versions related to / assigned to version 1.0.0. To set this up, perform the following:
- Go to the Color Cards Board Admin Screen.
- Select “Queries” from Colors Based On drop-down.
- Write the JQL query (fixVersion = 1.0.0).
- Select a color for the query.
- Click “Add”
You will see issues assigned to different versions in your backlog, Active Sprints, and Kanban boards.
Prioritizing And Identifying Issues
Looking to tackle those high priority bugs first? Easily view your high priority tasks / bugs / stories by selecting colors associated with Priorities assigned to your project.
For instance, to view all blocker issues with a Red color, perform the following:
- Go to the Color Cards Board Admin Screen.
- Select “Priorities” from Colors Based On.
- Assign a color to the priority “Blocker” (or your priority of choice).
- Click “Back to Board” and you will see the colors assigned to all your blocking issues.
If you are already using complex JQL queries for your board, you can still achieve this functionality by using “Queries” to base your color. Use a query, such as priority = Blocker, select the color next to the query and click “Add”.
How are you using Color Cards in your organization? Let us know! If you have questions, feel free to reach out to us: Ascend Integrated Contact.

by Mike Brown | Oct 29, 2018 | Ascend Blog, Jira, Project Atlassian
As Atlassian Experts and Solution Partner, Ascend Integrated uses many add-ons (apps) for implementing complex business requirements and scenarios. These add-ons / apps provide the ability to extend Jira further, either by adding scripts or configurations to meet evolving business needs. One add-on / app we’ve used with multiple clients to solve issues effectively and efficiently is
Automation for Jira. Automation for Jira frees your team to focus on what’s important: development and releasing shippable products and serving your customers.
With limited scripting, you can get a full automation suite up and running. The app relies on Rules set up in a “
When”, “
If”, and “
Then” structure. For instance, “When: Value changes for Field X, if field x = “Updated”, Then: Edit issue fields”. In this blog, we wanted to share with you 3 unique ways to automate your Jira instance using the Automation for Jira app.
Updating Read-Only Fields
Setting a read-only field in Jira is easy. You can view the Community answer here:
https://community.atlassian.com/t5/Jira-questions/Set-particular-custom-field-read-only/qaq-p/296959. If you’d like a read-only field value to update based on the values of other fields, Automation for Jira can accomplish this efficiently. Check out the configurations below:
- When: “Value changes for” rule (Be sure to select the “Execute this rule immediately…” option)
- If: set the JQL pointing to a specific field (i.e. Priority)
- Then: “Edit Issue Fields” to choose which fields to edit. (This would be a read-only field for the users. Users will not be able to manually set this field, it will automatically set based on JQL parameters.)
An example of how this rule will be set up is shown below:
Combine with Dynamic Forms
Dynamic Forms another fan favorite, provides the ability for fields to display dependent upon selected values. While Dynamic Forms fields do not work directly with Automation for Jira, you can have other fields update based on a Dynamic Forms Field’s value through JQL. To do this, set up the following:
- When: “Value changes for” rule
- If: set the JQL pointing to the Dynamic Form field
- Then: “Edit Issue Fields” to choose which field(s) to edit.
Managing Service Desk Tickets
If a user finds a verified bug, and they log it into Service Desk, Automation Jira can automatically create a cloned issue in your Jira development project, without agent intervention. To accomplish this, simply add a rule like the set up below:
- When: “Issue Created” rule
- If: set the JQL pointing to the field (i.e. customfield1000 = “X”)
- Then: “Create Issue” and select what values should be in the fields.
This ensures both the development and agent queue for specific bugs / issues are always in alignment. Interested in checking out the app? Download it from the Marketplace
here. It is available for Cloud, Server, and Data Center.
Have questions about building out automation in Jira? Reach us
here.
How have you used automation in Jira?

by Mike Brown | Feb 26, 2018 | Jira
As 2017 came to a close our team at Ascend Integrated asked ourselves a simple question: How does the Jira ecosystem exist within a small team? As many project management solutions have gone all-in on Enterprise solutions, Atlassian has maintained that Jira is prime for small teams while also possessing supreme scalability through the SAFe methodology within Jira. In this blog, we’ll explore how small teams can utilize Jira to its fullest extent.
Price
One of the most important features that make Jira small-team-friendly is cost. As many agile teams look to transition from the sticky-note on the whiteboard phase over to a project management tool, cost becomes a major factor. The cost for the cloud instance of Jira for 1-10 users is only $10 per month. Plus, adding users is quite easy and will cost you an additional $7 per user up to 100 users. As your team grows, your cost per user actually decreases. We would also recommend you go with annual pricing if you know that you will be using Jira for the foreseeable future.
Flexibility
Agile teams need the ability to work with speed, cohesiveness, and autonomy within the context of a single platform. Jumping between different project management tools wastes time and can cause confusion between departments. With Jira as your central hub, you have the ability to connect to products like Confluence and BitBucket. Jira’s seamless integration with these tools will allow your team to store development documentation, decompose team silos through open communication, and track development issues throughout the development lifecycle. Working with project managers, back-end engineers, and designers has never been easier thanks to these integrations.
Functionality
We’ve discussed price and flexibility, including two great integrations with Confluence and Bitbucket, but how does Jira itself standout from a user perspective? Jira’s custom workflows, JQL functionality, and personalized Kanban and SCRUM boards allow for members from all teams and skill levels to utilize Jira in a way that best suits their team while simultaneously tying back to the same projects. The beauty of Jira is that you can make it as simple or complex as your team needs, meaning once you of understanding vast amounts of customization at your disposal, you have complete autonomy over your workflows, visualizations, and tracking initiatives.
The Case for Collaboration
Jira certainly isn’t the only project management tool with flexibility and scaling ability, however, it is the best tool currently available with added documentation and repository integrations and some serious out-of-the-box usability for a small-team budget. If your team is looking for a low-risk project management solution to start off the new year, then we strongly suggest giving Jira a try!